
Intimidated by the idea of a gallery wall? You're not alone. Many of us have collected artwork over the years that now mostly sits in storage because we're not sure how to cohesively display it all, especially if you've moved homes or your aesthetic has evolved. This is exactly what happened to my parents, so last winter I convinced (coaxed) them to finally put up their art after 7 years in their 'new' home with bare walls. My mom and dad buy art everywhere they travel and have been collecting meaningful pieces throughout their 37 year marriage. Their biggest hurdle to putting it up on the walls when they moved into their more modern new build in 2016 was that all of the art was in more vintage (read: 'dated') frames, and they didn't feel like it went with the aesthetic, but also weren't prepared to drop $$$ to have it all reframed (and thank god they didn't - what a shame that would have been!!). I made it my mission to show them that they could blend the two, and the result was a new home suddenly steeped in 30+ years of rich history.
Here are 4 tips to creating your own gallery wall, without the stress!
Tip #1: Plan and Prepare
Before you start hammering nails into the wall, take a step back and plan your gallery wall. Consider the layout and arrangement of your artwork. Here are a few things to think about:
- The wall's size and shape: Will your art fit well, or should you choose a different wall based on what else is along that wall?
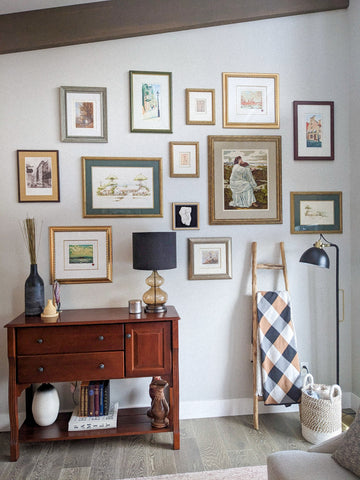
- The center of attention: Decide on a focal point or piece you want to highlight and build around it. Remember that the focal point does not have to be in the centre of the wall, it just needs to be the most prominent in terms of size or colour palette. We chose a needlepoint piece done by my late grandfather as our focal point both because of its size and sentimental value.
Pro Tip: To avoid putting holes in your walls (and in case of any mishaps - because they happen) use 3M strips for hanging your artwork instead of nails or picture hangers. This gives you more flexibility for moving pieces around or future additions.

Tip #2: Group and Balance
Gallery walls can be the perfect way to showcase a diverse collection of artwork. To achieve a balanced and harmonious look, consider these grouping techniques:
- Symmetrical: Arrange pieces with the same size and shape in a balanced pattern.
- Asymmetrical: Mix and match different sizes, styles, and frames for a more eclectic look.
- Grid: Create a precise grid pattern for a clean and organized appearance.
- Salon-style: Overlap and stack artworks for a salon-style display that's full of character.

Tip #3: Measure Twice, Hang Once
The age-old saying "measure twice, cut once" applies to artwork hanging too. Measure the wall, your artwork, and the space between pieces. This ensures that everything is level and correctly spaced. Use a level to make sure your artwork doesn't end up looking crooked – there's nothing worse than a lopsided painting!
Pro Tip: Map out your gallery wall using painter's tape so you can visualize what it will look like complete and make any necessary adjustments to grouping or spacing. Remove the tape as you hang each piece so you don't lose your guiding blueprint.
Tip #4: Artistic Heights
The perfect height for hanging artwork is typically at eye level, which is about 57 to 60 inches from the floor. However, don't be afraid to play around with different heights for variety and visual interest, especially if you have super high ceilings or a vault like my parents do. Just remember, consistency is key. If you're hanging multiple pieces, align them at roughly the same height for a cohesive appearance.
Happy hanging!!